Due to using a base64 encoded string, the file upload size is limited due to string length restrictions (a little under 10MB).
Our Enterprise and Extra versions of e-ttach enable file uploads 4GB+
Microsoft Dynamics 365 F&O is an extremely feature-rich piece of software, and the new web interface has brought a fresh and modern take on the older AX 2012 front-end – there are however several areas where the current UI falls short when compared to the UX end users are used to with most modern web sites.
The document management experience within Dynamics 365 F&O is (in my personal opinion) severely lacking and one of the key areas where it falls over is the lack of any drag and drop functionality.
So without any further ado, I have documented below exactly how to create a simple form control which enables you to drag and drop files directly into Dynamics and have it create document handling records.
Custom Form Control
We do this by creating a custom form control which has a very basic HTML body and javascript functionality to enable the file drop.
I’d like to reference the following few blog posts which I used to help create this solution:
http://dev.goshoom.net/en/2016/12/extensible-control-htmljavascript/
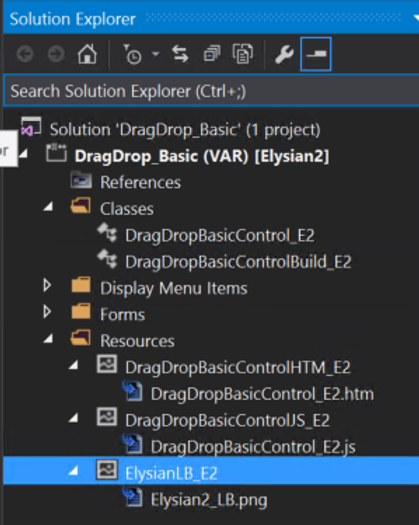
The standard process of creating a custom control is to create 2 classes (a FormBuildControl and FormTemplateControl class).
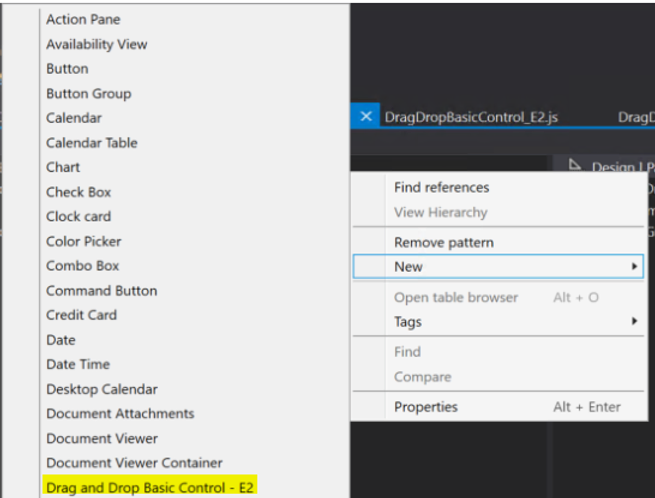
My FormBuildControl class is very simple and really only acts to display the name of the control type (Drag and Drop Basic Control – E2)
[FormDesignControlAttribute("Drag and Drop Basic Control - E2")]
class DragDropBasicControlBuild_E2 extends FormBuildControl
{
}
My FormTemplateControl class has a bit more logic involved (it defines which HTML resource the control uses and has the logic to upload the file / create the document handling record).
[FormControlAttribute('DragDropBasicControl_E2', 'DragDropBasicControl_E2', classstr(DragDropBasicControlBuild_E2))]
class DragDropBasicControl_E2 extends FormTemplateControl
{
 protected void new(FormBuildControl _build, FormRun _formRun)
 {
 super(_build, _formRun);
 this.setResourceBundleName('/Resources/Html/DragDropBasicControl_E2');
 }

 [FormCommandAttribute("UploadFile")]
 private void uploadFile(str _fileName = "", str _content = "")
 {

 Object formRunObj = this.formRun();
 boolean uploaded = false;
 if(formRunObj)
 {
 FormDataSource fds;

 Object dsObject = this.dataSourceObject();

 fds = this.formRun().docCursor().datasource();

 if(fds)
 {

 DocuRef docuRef = this.createDocuRefFromDataSource(fds, _fileName);
 DocuActionFile docuActionFile = DocuAction::newDocuRef(docuRef);
  str filename, ext, path;

 [path,Filename,ext] = fileNameSplit(_fileName);

 System.Byte[] messageBytes = System.Convert::FromBase64String(_content);

 System.IO.MemoryStream memoryStream = new System.IO.MemoryStream(messageBytes);

 docuActionFile.attachFile(docuRef,_fileName, ext,memoryStream);
 uploaded = true;
 }

 }
 if(uploaded)
  Info(strFmt("Uploaded File '%1'",_fileName));
 }

 public DocuRef createDocuRefFromDataSource(FormDataSource fds, str _fileName = "")
 {
 DocuRef docuRef;
 Common record = fds.cursor();

 docuRef = this.createDocuRefFromCommon(record,_fileName);

 return docuRef;
 }

 public DocuRef createDocuRefFromCommon(Common record, str _fileName = "")
 {
 DocuRef docuRef;
 docuRef.clear();
 docuRef.RefTableId = record.TableId;
 docuRef.RefRecId = record.RecId;
 docuRef.RefCompanyId = record.dataAreaId;
 docuRef.Name = _fileName;
 docuRef.TypeId = "File";
 docuRef.insert();

 return docuRef;
 }
}

Then you also need to create basic HTML and JS resource files and then create resources within the AOT which reference these files:
The content of these files are as follows:
DragDropBasicControl_E2.htm (Note: make sure the suffix is .htm and not .html)
<script src="../scripts/DragDropBasicControl_E2.js"></script>
<div id="DragDropControl_E2"class="drop-area">
 <p>Drop File Here</p>
 <img src="/resources/Images/Elysian2_LB.png"/>
</div>
DragDropBasicControl_E2.js
(function () {
 'use strict';

 $dyn.ui.defaults.DragDropBasicControl_E2 = {};
 $dyn.controls.DragDropBasicControl_E2 = function (data, element) {
 var self = this;
 $dyn.ui.Control.apply(self, arguments);
 $dyn.ui.applyDefaults(self, data, $dyn.ui.defaults.DragDropBasicControl_E2);

 $(element).css("border", "2px dashed #EAEAEA");
 $(element).css("position", "relative");
 $(element).css("border radius", "20px");
 $(element).css("width", "100px");
 $(element).css("margin", "50px auto");
 $(element).css("padding", "20px")

 function fileUpload(file) {
 var reader = new FileReader();
 reader.readAsDataURL(file);
 reader.onload = function () {
 var base64result = reader.result.split(',')[1];
 $dyn.callFunction(self.UploadFile, self, { _fileName: file.name, _content: base64result });

 };
 reader.onerror = function (error) {
 console.log('Error: ', error);
 };
 };


 // ************************ Drag and drop ***************** //
 let dropArea = this.element;

 // Prevent default drag behaviors
 ;['dragenter', 'dragover', 'dragleave', 'drop'].forEach(eventName => {
 dropArea.addEventListener(eventName, preventDefaults, false)
 })

 // Handle dropped files
 dropArea.addEventListener('drop', handleDrop, false)

 function preventDefaults(e) {
 e.preventDefault()
 e.stopPropagation()
 }

 function handleDrop(e) {
 var dt = e.dataTransfer
 var files = dt.files

 handleFiles(files)
 }

 function handleFiles(files) {
 files = [...files]

 files.forEach(uploadFile)
 }

 function uploadFile(file, i) {
 fileUpload(file);
 }

 }
 $dyn.controls.DragDropBasicControl_E2.prototype = $dyn.extendPrototype($dyn.ui.Control.prototype, {
 init: function (data, element) {
 var self = this;
 $dyn.ui.Control.prototype.init.apply(this, arguments);

 }
 });
})();
Create the new references in the AOT selecting these files – then you should have a basic project with your 2 classes and resources:
(I’ve also included an image Elysian_LB.png to display inside the control).
After building the solution you have the new Drag and drop control available to add to any form.
Use the control
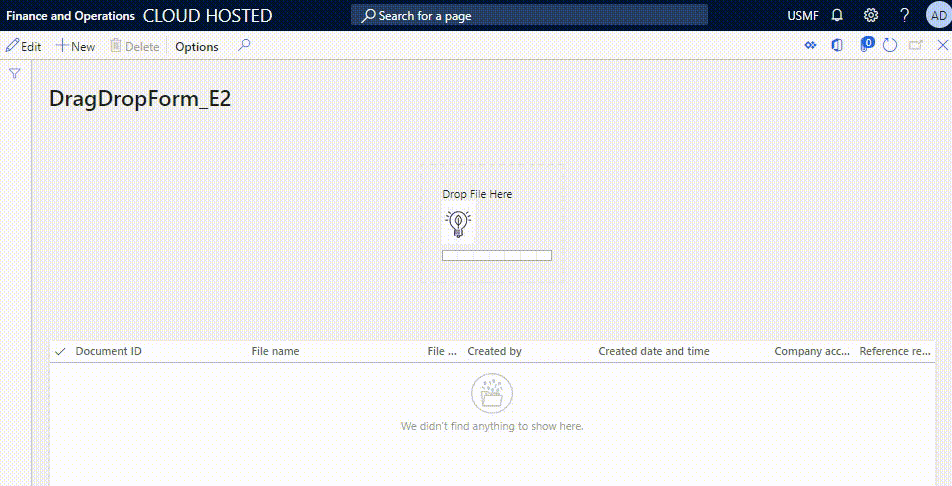
I’ve created a simple form with the new drag and drop control on there – along with a grid to display the document handling records as they are added.
We get an Infolog message for each file as they are uploaded and the docuRef records are displayed in the grid on the form.
So there we have it – you can add this control to any form within Dynamics and you can now drop files in as attachments.
The full project is available here as an axpp to import:
You can also spruce it up a little by highlighting the border when dropping files and make it more user friendly with form parts and dialogs.
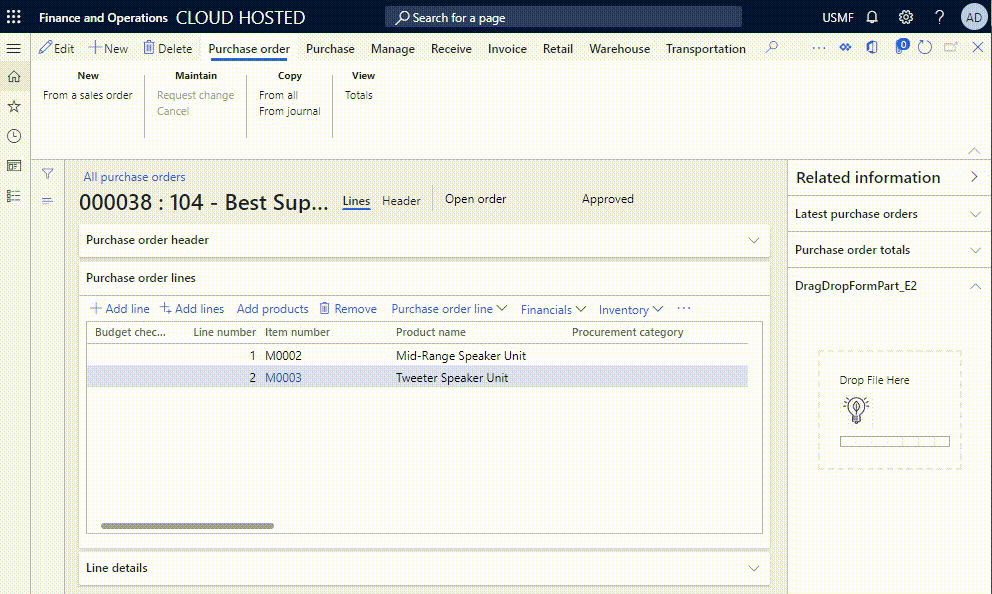
One step closer to providing users with a more streamlined document management experience.

Drag and Drop in Dynamics 365 F&O