How to connect D365 Finance and SCM build pipeline to published DevOps Artifact Feeds
A major pain-point of the All-in-one deployable packages now in use for Dynamics 365 Finance and SCM is installing and keeping up to date with the latest ISV solutions.
There is no option to install or remove applications / ISV solutions quickly and easily to test them, I hope down the track this changes and installing a new module is a simple as clicking “install” from Appsource.
Until such a solution is available, the process requires a technical resource (from either a partner or end user) to install the ISV solution into the build branch and generate a build that contains all your customisations as well as that ISV solution.
Thankfully we now have Artifact feeds which can be used by ISV provides to publish their latest solution for customers to connect to and pull down into each new deployable package they generate.
This guide will run through the basic process of connecting an Artifact feed and include it in your deployable package without having to add the entire ISV deployable package to your branch and continue to install each update manually.
1. Clone your existing pipeline (make a copy)
This step is as straight forward as logging into Azure DevOps going to your existing pipeline(s) and choosing to clone it.


Next rename your new repository and save the changes (don’t queue a build at this point).
2. Add new files to your repository with ISV feed details
The first thing we need to do here is to create a Nuget.config file that references the Artifact feed that will be downloaded:
The required config file values can be found by going to the ISV feed directly.
For e-ttach we use the following:

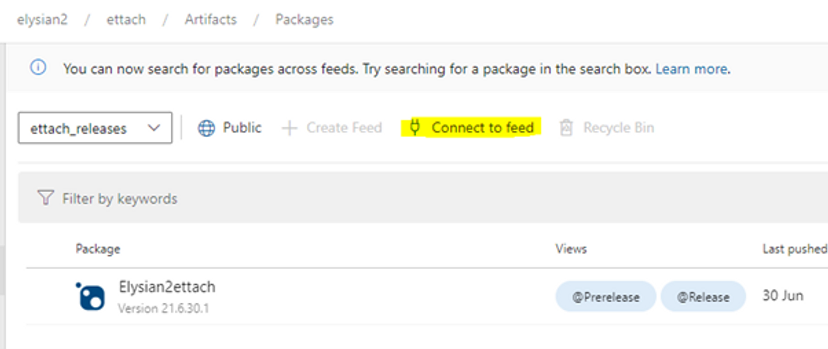
Click Connect to feed to get the connection string details:


Select NuGet.exe and you can see the required nuget.config data:
<?xml version="1.0" encoding="utf-8"?>
<configuration>
 <packageSources>
 <clear />
 <add key="ettach_releases" value="https://pkgs.dev.azure.com/elysian2/ettach/_packaging/ettach_releases/nuget/v3/index.json" />
 </packageSources>
</configuration>
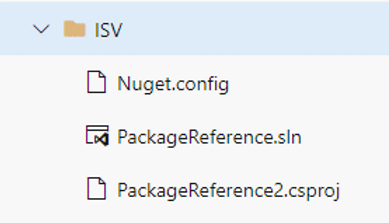
This file will need to be uploaded to your DevOps Repository – for the purpose of this guide I have created a separate ISV folder under the Top level “Trunk” folder in DevOps:


The next part of the process is to create Solution (.sln) and Project (.csproj / .rnproj) files.
This can be done directly from Visual Studio 2017 (Create a new project or update an existing project) and apply the Nuget Package to the project:


From here you can configure your nuget source and install the latest package in your solution.
Note: this solution populates additional data that isn’t required and the version by default is fixed at the current release.
For the purpose of this Guide we will manually create a couple of files and upload them to DevOps directly.
My Project file is just called “PackageReference2.csproj” and contains the following XML:
<?xml version="1.0" encoding="utf-8"?>
<Project ToolsVersion="14.0" DefaultTargets="Build" xmlns="http://schemas.microsoft.com/developer/msbuild/2003">
 <PropertyGroup>
 <ProductVersion>8.0.30703</ProductVersion>
 <SchemaVersion>2.0</SchemaVersion>
 <ProjectGuid>{F94BEC21-1BE9-484E-8BAA-CA8A5CFEB879}</ProjectGuid>
 <RootNamespace>PackageReference2</RootNamespace>
 <AssemblyName>PackageReference2</AssemblyName>

 </PropertyGroup>
 <ItemGroup>
 <PackageReference Include="Elysian2ettach">
 <Version>1.0</Version>
 </PackageReference>
 </ItemGroup>

 <Import Project="$(MSBuildToolsPath)\Microsoft.CSharp.targets" />
 <Import Project="$(MSBuildExtensionsPath32)\Microsoft\Dynamics\AX\Microsoft.Dynamics.Framework.Tools.Extensibility.targets" Condition=" '$(INETROOT)' == '' " />

</Project>
Note: Inside the <PackageReference> node - Version 1.0 tells nuget to pick up the version of Elysian2ettach greater than or equal to 1.0 (as we use the year as the major version – 21.x.x is greater than 1.0 and is used).
The Solution file is called PackageReference.sln and it’s only purpose is to reference my PackageReference2.cspoj project file.
The content of this file is:
Microsoft Visual Studio Solution File, Format Version 12.00
# Visual Studio 15
VisualStudioVersion = 15.0.28307.1585
MinimumVisualStudioVersion = 10.0.40219.1
Project("{FAE04EC0-301F-11D3-BF4B-00C04F79EFBC}") = "PackageReference2", "PackageReference2.csproj", "{F94BEC21-1BE9-484E-8BAA-CA8A5CFEB879}"
EndProject
Once these files have been created they can also be added to DevOps – I also placed these under my ISV folder:

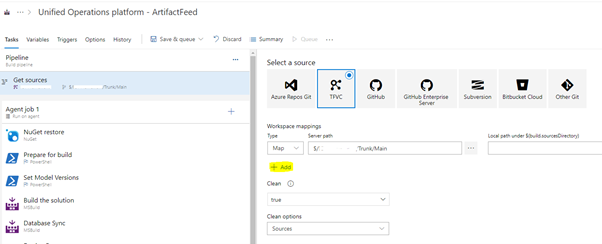
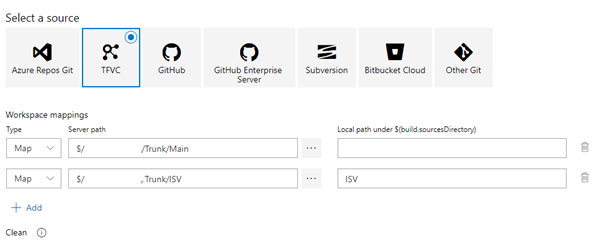
3. Configure new repository to pull the new files
Note: This step is only applicable if you add your new files to a branch/repository that differs from your existing branch.
This is where we need to edit our cloned pipeline and configure the additional repository.
Here I add the additional mapping for my new ISV folder – which will create a new “ISV” folder under the build directory when the build is run:
4. Add a Git restore step to restore the ISV package prior to building your solution
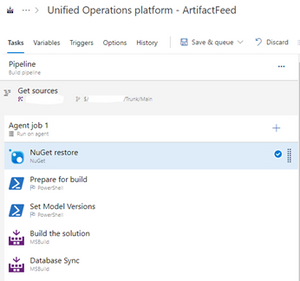
Click on the + next to the Job in your pipeline and add a new step:


Search in the top right hand corner for nuget, select the result just called “NuGet” and click the “Add” button.

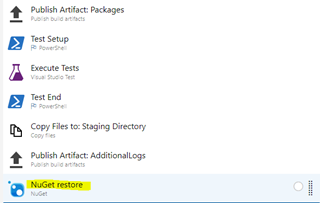
That will add the new NuGet step to the end of your pipeline, you now need to drag this up to the top before the “Prepare for build” step:

Next we need to tell the NuGet step where the Nuget.config file is and where to find the previously uploaded Solution and Project files.


Expand both the Feeds and authentication and Advanced fast-tabs, populate the NuGet.config path with the link to the uploaded file – $/PROJECT/Trunk/ISV/Nuget.config
Populate the Destination directory with a new folder for the package to be extracted to – in my case it is $(build.sourcesDirectory)/ISV/packages
This is what the Ettach folder naming convention looks like after downloading and restoring from Nuget:


Unfortunately this causes the build to fail when it expects the Folder name should match the model – e.g Elysian2ettach and have a direct bin folder within that.
So to “flatten” the new folder after the restore we need to add another task – this time with a type of “Command line”


Give it a descriptive name (I’ve used FlattenFolders):


Set the Working Directory to be the Destination directory that the Nuget restore step used - $(build.sourcesDirectory)\ISV\packages
And enter the following in the script:
@echo off

for /D %%d in (*) do (
cd %%d
mkdir bin
for /D %%e in (*) do (
cd %%e
for /r %%f in (*) do @copy "%%f" ..\bin
)
)
This script – looks at all directories in the folder and steps through each one, then creates a new bin folder and copies all the binary data from the subfolders into that bin folder.
Note: Make sure you tick “Continue on error” under control options – as this process can generate an error.
The final part of this process is to copy the extracted packages to the Metadata folder for build - this requires a new file copy task to be added to the pipeline:
So add a new task and search for “copy”, then add the “Copy files” task:


Rename this step to something meaningful – in my case “Copy files to Metadata”:


Set your Source folder to the destination directory from the Nuget restore step - $(build.sourcesDirectory)\ISV\packages
And the Target folder to the Metadata folder - $(build.sourcesDirectory)\Metadata
And that’s it – time to run the pipeline.
5. Use the new pipeline for future deployable packages.
Save and queue the pipeline and let it run:


We can see the Nuget restore step pull down and use the latest version from the Artifact Feed prior to building the solution:


Now every time this pipeline is run it will pick up the listed Nuget Package in the DevOps Artifact feed, which means no need to manually download and install updates.

Stay up to date with the Latest D365 ISV versions.